Part 1 - Creating an nx workspace
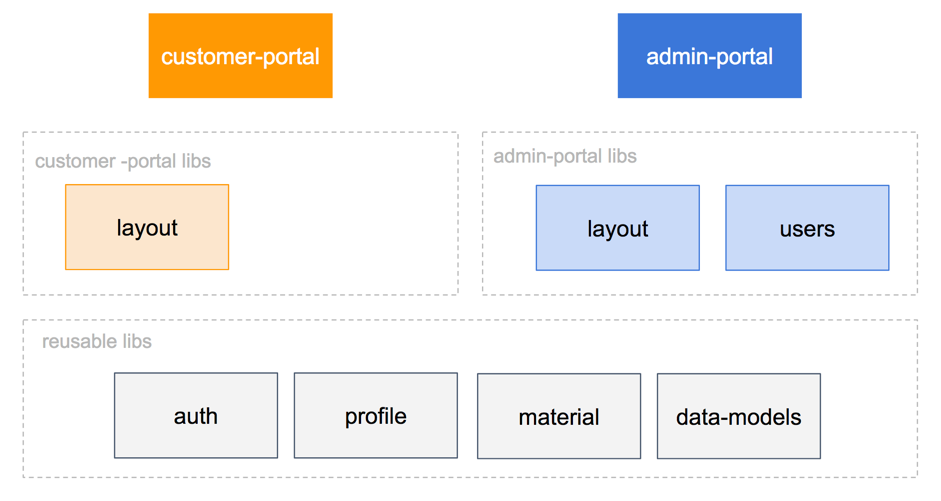
We will be building out the beginning of two applications a customer portal and an admin portal.
 figure: nx workspaces diagram
1 .Create a new nx workspace
- Run the below command in a terminal to make a new nx workspace.
create-nx-workspace demo-app
2. Examine the output of the following files and commit code to git source control
- Run the following command to open the new nx workspace in VSCode.
cd demo-app && code .
Until this pull request https://github.com/nrwl/nx/issues/198 is merged run the following in the terminal to avoid warnings in terminal.
npm install [email protected] --save
Inspect the following files:
.angular-cli.json
tsconfig paths
package.json
3. Change from css to scss
- Open up angular .angular-cli.json and change the default style type.
.angular-cli.json
"styleExt": "scss"
- Commit the initial NX workspace to source control
4. Create a new workspace app
- By default a new NX workspace has no apps or libs yet. You can run the below command to see the extra options to make an app or a lib besides the normal angular CLI commands.
ng g app --help
- Create a new app by running the below command in the terminal in a directory of your choice.
ng g app customer-portal --style scss --routing
5. Add ngrx
- Add a default set up for ngrx to our new app. We can run the generate command for ngrx with the module and --onlyEmptyRoot option to only add the StoreModule.forRoot and EffectsModule.forRoot calls without generating any new files versus --root which will make a default reducer and effect.
ng g ngrx app --module=apps/customer-portal/src/app/app.module.ts --onlyEmptyRoot
6. Examine angular app and module structure
- app.module.ts
- tsconfig paths
- package.json
- apps and libs empty
7. Run the app in the browser
- Run the following command to launch the app in the browser. -a is for the app to start and -o is to open in the default browser.
ng s -a=customer-portal -o
- See the default state of the app in the redux dev tools
